Showing posts with label WFMW. Show all posts

Wednesday, February 10, 2010

WFMW - Hairstyles for girls (and mom!)

One of the things I absolutely love is fixing Ella's hair. Unfortunately, I was born with absolutely no talent when it comes to hair. I remember many painful hours spent in front of the mirror as a teenager trying to fix my hair only to hate the end result. Luckily for me, there are a ton of blogs that have come to my little girl's rescue. They show step by step how to give your daughter (or yourself) the cutest hairstyles around. I fix Ella's hair every morning before preschool and church. We are stopped at least once a day getting compliments on how cute her hair is. These blogs make it so easy that if I can do it, anyone can.

The first blog I found was "She does Hair." She no longer posts on this blog but I think it is a great place to learn the basics of hair styling. I still look through her archives a lot when I want a simple do. Here's the link:

She Does Hair

My go-to blogs for hair styles are these next two. Both bloggers have multiple girls and show everything from easy to complicated hair styles. They have quick video clips for some of the hairstyles so you can actually see how to do it. This helped me a lot when learning to curl with a flat iron and how to dutch braid. "Adopt a Do" has a lot of super quick hairstyles for the morning and even a section for dads.

Adopt a 'Do - Cute Girls Hairstyles

Babes in Hairland

I LOVE these next three hair blogs also and look at them frequently - I just don't find myself using them as much as the others.

It's a Girl Thing

The Story of a Princess and Her Hair

Girly Do's by Jen

Ella knows her hair HAS to be fixed before she leaves the house for school. Depending on her mood (and the time) sometimes we do super simple (like a french braid) or a hair headband. I like to let her pick her hairstyle the night before, that way she is a lot more cooperative in the morning. Here are some of the examples of hairstyles we have learned to do.

I searched through my photos to try and find some pics of Ella's hair done and it turns out most of my pictures don't really show off the hair, so I will have to try and take some that show the whole style. But here are a few where you can kind of see what I have done. I really really wish that I had taken more pictures of the different hair styles because I am missing most of my favorites.

I do variations of this style a lot (I wish I had better and more pictures)! These two hair-do's end in messy buns but I also finish it off using two ponytails, one ponytail, one bun, or leaving it down. I also will braid or twist the crosses. I have also thread ribbon through the crosses which is super cute. You can also do this hairstyle upside down with the buns ending up on top. You can find the instructions for this hairstyle on almost every blog I link to. It really is a lot easier than it looks.


This next hairstyle was a mistake but I was too tired to go back and fix it. Suprisingly, I had a lot more people stop me that day than usual.


I only wash Ella's hair every other day so a lot of her hairstyles are transformed for the next day. This next one, I just took the back down and put her hair into a ponytail.


In this next picture, her hair had two french braids the day before. In the morning it was really wavy and cute but it rained this day so the waves were gone by the time I took the picture.

I found this next hairstyle on "Babes in Hairland." It is one of my favorites to do because it is easy to adapt into a number of different hairstyles at the end. I don't often have enough time to do the "X" on the side so we will finish it with a braided bun and cute bow. I'm going to show the front, top, and back of this hair-do.

In this first pic, we had been at the farm all day and the side kind of got messed up (but still cute).


One more new blog I have found is Redpunzel. She has a section for Mom-Do's that are really cute and easy. I have had fun trying them on my own hair - sorry no pics of me.

Another post that might be of interest to you is how to make the cute hair bows you see everywhere. They are super easy! Here is the link:

Easy Hair Bow Instructions

For more great tips and ideas head to We are That Family where she hosts "Works For Me Wednesday" every week.

My previous WFMW posts:

Sweet Spinach Bread
Library Bags
Letterboxing
Curling Ribbon
Safe Plastics
5 Ingredients or Less
Laundry Tip
DIY Lip Gloss
Tips for Clothes Shopping with girls
How to teach a child to swallow pills
Removing old stickers, adhesive, etc.
Easy Hair Bow Instructions
Managing school papers
Fall Traditions
Coupon Binder
Toys Worth Buying - Board Games

Thanks for visiting!

Tuesday, January 27, 2009

WFMW - Cooking with YouTube

My awesome little brother Matt is visiting us right now and showed me my favorite cooking tip for the week.

This is so simple - it's genius. If you are ever stuck trying to come up with something to make for dinner (me - almost every night), head on over to YouTube. You can do a simple search for whatever main ingredient you have, i.e. beef recipes, chicken recipes, etc. You can take it a step further and add adjectives like "healthy," "easy," "gourmet," or whatever to the mix. YouTube is full of short cooking videos . I'm a visual person when it comes to food so this is better for me than searching through recipe books.

For more great tips and ideas head to Shannon's blog where she hosts Works for me Wednesday every week.

For more great tips and ideas head to Shannon's blog where she hosts Works for me Wednesday every week.

My previous WFMW posts:

Sweet Spinach Bread
Library Bags
Letterboxing
Curling Ribbon
Safe Plastics
5 Ingredients or Less
Laundry Tip
DIY Lip Gloss
Tips for Clothes Shopping with girls
How to teach a child to swallow pills
Removing old stickers, adhesive, etc.
Easy Hair Bow Instructions
Managing school papers
Fall Traditions
Coupon Binder
Toys Worth Buying - Board Games
Extending Battery Life

Tuesday, January 20, 2009

WFMW - Extending Battery Life

Here's a quick tip I learned from my cousin when I became a real estate appraiser. The last thing you want to have happen on an appraisal is for your batteries to die. If that happens, you have to schedule another time to come out and take pictures and reinspect. So if your batteries ever die in your camera and you don't have replacements, here's what you do:

1. Take all batteries out.

2. Rub batteries between hands.

3. Put batteries back in camera.

4. Take 2-3 more pictures.

5. Repeat if needed.

This will give you a couple more pictures each time. I have done this four times back to back and was able to get 12 more pictures after my batteries died the first time. I wonder how long it would keep working, maybe I'll have to test that some time.

For more great tips and ideas head to Shannon's blog where she hosts Works for me Wednesday every week.

My previous WFMW posts:

Sweet Spinach Bread
Library Bags
Letterboxing
Curling Ribbon
Safe Plastics
5 Ingredients or Less
Laundry Tip
DIY Lip Gloss
Tips for Clothes Shopping with girls
How to teach a child to swallow pills
Removing old stickers, adhesive, etc.
Easy Hair Bow Instructions
Managing school papers
Fall Traditions
Coupon Binder
Toys Worth Buying - Board Games

Tuesday, November 25, 2008

WFMW - Thanksgiving Macaroni

There really is nothing thanksgivingish about this macaroni recipe. Is macaroni and cheese even really a Thanksgiving dish? Or is it just in my family? As far as I'm concerned, pasta should be a part of any celebration. Anyway, I call this Thanksgiving macaroni because it is one of the only times of the year that I will allow myself to eat this delicious concoction that has 500,000+ calories in every bite. I kid you not. But once you take a bite of it, you will no longer care. It is that good.

The beauty of this recipe (besides the 3 yummy cheeses) is how easy it is to make, yet it seems very impressive to friends and family. It helps me continue with my masquerade of being a good cook. Just be careful about who you make it for - you will be asked to make it again and again and again :)

Ingredients:

Butter for greasing the dish
12 oz wide egg noodles
3 cups whipping cream
1-1/2 cups whole milk
1 Tbsp flour
1/2 tsp salt - plus more for pasta
1/4 tsp freshly ground black pepper
2 cups (packed) grated Fontina
3/4 cups (packed) finely grated parmesan
3/4 cups (packed) grated mozzarella
4 oz. cooked diced ham - optional (sometimes I throw in Trader Joe's prosciutto)
2 Tbsp finely chopped fresh Italian parsley leaves

Preheat oven to 450. Butter a 9 x 13 glass baking dish and set aside. Cook the noodles in a large pot of boiling salted water until firm - tender (about 5 minutes). Drain well but do not rinse. Whisk the cream, milk, flour, 1/2 tsp salt, and pepper in a bowl to blend. Stir in 1 cup Fontina, 1/2 cup parmesan, 1/2 cup mozzarella, ham, and parley. Add the noodles and toss to coat. Transfer the noodle mixture to the prepared baking dish. Toss the remaining 1 cup Fontina, 1/4 cup parmesan, and 1/4 cup mozzarella in a bowl. Sprinkle the cheese mixture over the noodle mixture. Bake until the sauce bubbles and the cheese melts and begins to brown on top. Takes about 20 minutes. Let stand 10 minutes before serving. Serves 6.

Recipe from the Food Network a couple years ago - I can't remember which chef.


For more great tips and ideas head to Shannon's blog where she hosts Works for me Wednesday every week.

My previous WFMW posts:

Sweet Spinach Bread
Library Bags
Letterboxing
Curling Ribbon
Safe Plastics
5 Ingredients or Less
Laundry Tip
DIY Lip Gloss
Tips for Clothes Shopping with girls
How to teach a child to swallow pills
Removing old stickers, adhesive, etc.
Easy Hair Bow Instructions
Managing school papers
Fall Traditions
Coupon Binder
Toys Worth Buying - Board Games

Tuesday, November 18, 2008

WFMW - Super easy way to melt chocolate!

My MIL makes the best chocolates every year for the Holidays. She taught me this super easy way to melt chocolate - no double boiler required. Here it is broken down:

1. Turn on oven just until it clicks on. You want it on the lowest degree possible.

2. Chop up chocolate and put in glass baking pan. If I'm doing a small amount or a single batch, I use the Pyrex glass measuring cups.

3. Put pan in oven and check often to make sure the pan is not getting too hot. An easy way to test this is to touch the pan. If the pan is too hot to pick up without hot pads - IT IS TOO HOT. If this happens, take the chocolate out, cool it off, and then return to the oven.

4. Stir the chocolate often as it melts.

Yum . . . I'm ready to go make chocolates right now. I love the Holidays!


ALTERNATIVE METHOD: If you can't get your oven to a low enough temperature (I lived in one house where this was the case) turn the oven on just until it clicks on. Leave on for 5 minutes and then turn off right before you put the chocolate in.

For more great tips and ideas head to Shannon's blog where she hosts Works for me Wednesday every week.

My previous WFMW posts:

Sweet Spinach Bread
Library Bags
Letterboxing
Curling Ribbon
Safe Plastics
5 Ingredients or Less
Laundry Tip
DIY Lip Gloss
Tips for Clothes Shopping with girls
How to teach a child to swallow pills
Removing old stickers, adhesive, etc.
Easy Hair Bow Instructions
Managing school papers
Fall Traditions
Coupon Binder
Toys Worth Buying - Board Games

Wednesday, November 5, 2008

WFMW - Toys Worth Buying (Board Games)

I have been so excited for WFMW this week. The theme is TOYS WORTH BUYING. I can't wait to read everyone's recommendations.

We are a family who loves board games. We have several cabinets full of them and are always on the hunt for more. One of the reasons I love consignment sales is to sell the games we haven't liked and try new games out cheap. Anyway, here are my top recommendations for board games. Because I'm lazy, I put the manufacturer's description with each game with my review following.

FOR YOUNGER KIDS:

Zingo Product Description from Manufacturer: Bingo with a Zing!
A fast-paced, simple variant of Bingo. Players try to fill their image cards with matching tiles from the"Zingo Master"; first player to fill his/her card wins! Rules can be adjusted to favor more or less competition among players, and to vary length of time that each game takes to play. Zingo teaches shape and pattern recognition, as well as observation, and short-term memory.


This game has been very popular at our house. Spencer loved it when he was in preschool and now it is Ella's favorite. I brought it to preschool once for all the kids to play (up to 8 players can play at once) and afterwards every mom bought one for their kids. It is easy enough that the kids can play together without adult supervision and it is one that my kids will sit and play forever. It is a great first game because reading is not required - they can just match the pictures but it is still fun for older kids as well.

4 Way Countdown - Product Description from the Manufacturer:
Take the ultimate math challenge. Kids can practice their skills in addition, subtraction, multiplication and division skills by simply using the numbers on the dice. The first to flip over all 10 numbered keys wins the game. Game board includes sliding cover for easy storage. 2-4 players.
We bought this game in the clearance section one year after Christmas for $2. We were so surprised by how much fun it is. Each player has 10 numbered keys that they are trying to flip over. On your turn, you roll the dice and choose a function to make a number 1-10. For example, if you roll a 2 and 1, you could add to make 3, subtract to make 1, multiply to make 2, etc. So the kids are constantly thinking of different math solutions to get the numbers they need. To make it a little harder, if certain number's are rolled you have the option of turning all your opponent's keys back over so they are at the beginning of the game again. I have probably made this game sound a lot more complex than it actually is. We gave this as a class gift to Spencer's 1st, 2nd, and 3rd grade classes.

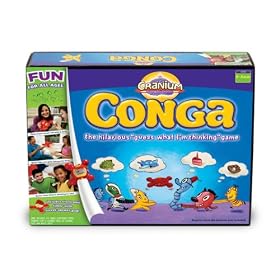
Cranium Conga- Product description from manufacturer: Cranium Conga is the fast-paced "guess what I'm thinking" game that will get your whole family acting, sculpting, guesstimating, and picking hilarious words. Conga celebrates the fun facts and funny memories that only someone close to you would know. This delightful game offers giggles and laughs for everyone -- from 8-year-olds, to teenagers, to mom and dad -- so turn off the TV and share some high-flying fun.
This game focuses on how well you know the people around you. In typical Cranium fashion there is acting, sculpting, etc. We have played this often on family nights. The suggested age is 8+, I would disagree and say 5+ (as soon as they are reading and writing). Ella plays now with us with help from her parents :)

FOR OLDER KIDS (AND ADULTS!):

Ticket to Ride Product description from the manufacturer: October 2, 1900. 28 years to the day that noted London eccentric, Phileas Fogg accepted and then won a L20,000 bet that he could travel "Around the World in 80 Days". Now at the dawn of the century it was time for a new "impossible journey". Some old friends have gathered to celebrate Fogg's impetuous and lucrative gamble--and to propose a new wager of their own. The stakes: $1 Million in a winner-takes-all competition. The objective: to see which of them can travel by rail to the most cities in North America--in just 7 days. The journey begins immediately. Ticket to Ride is a cross-country train adventure where players collect cards of various types of train cars that enable them to claim railway routes connecting cities throughout North America. Included in this popular game made by Days of Wonder is a detailed board, game cards, help cards, rules, train miniatures, and more!
Ticket to Ride is one of my all time favorite games. We play this over and over and over and I am still not sick of it. The game involves a lot of strategy but it is easy enough for a kid 8+ to play as well. If you need a GREAT board game - this is it! One more nice thing, it doesn't take all night to play like Monopoly or Risk, typical game is about 45 minutes.

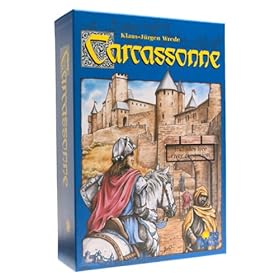
Carcassonne Product description from manufacturer: The southern French city of Carcassonne is famous for its unique Roman and Medieval fortification. In this clever tile-laying game, players develop the area around Carcassonne and deploy their followers on the roads, in the cities, in the cloisters and in the fields. The skill of the players to develop the area will determine the victor. For 2-5 players.
This is another strategy game. If you liked Settlers of Catan, chances are that you will LOVE this. You take turns laying tiles trying to build roles, cathedrals, monasteries, etc. The game has an element of both skill and luck. It is definitely not your standard board game and a lot of fun!

I would LOVE to hear your favorite games - we are always looking for more!

For more fun toy ideas head to Shannon's blog where she hosts Works for me Wednesday every week.

My previous WFMW posts:

Sweet Spinach Bread
Library Bags
Letterboxing
Curling Ribbon
Safe Plastics
5 Ingredients or Less
Laundry Tip
DIY Lip Gloss
Tips for Clothes Shopping with girls
How to teach a child to swallow pills
Removing old stickers, adhesive, etc.
Easy Hair Bow Instructions
Managing school papers
Fall Traditions
Coupon Binder

Tuesday, October 28, 2008

WFMW - Coupon Binder

After finally starting The Grocery Game in January, I have become obsessed with coupons and just how cheap I can get something. Yep, I am THAT coupon lady. I knew very early on that I needed a system to stay organized or couponing would never work for me. It had to be easy and FAST on both ends (both clipping at home and using them in the store). I poured over different coupon organization methods for a couple of days and this is what I ended up using, definitely not my original idea but something that works for me . . .

Here is my coupon binder:


Just look how lovely and FAT it is:


TRUE STORY: A couple of weeks ago I noticed my binder was missing. After frantically combing the house I knew it was gone forever. I just knew that if I had left it behind whoever found it would not be able to resist taking it home with them. So many GOOD coupons! For Free! A couple hours later I realized I am a big fat geek and not everybody shares my same obsession. I called Harris Teeter and it was sitting in the Lost and Found. Thank goodness.


Okay, back to organizing.

I get 4 Sunday papers. I have 3 delivered to my home and I buy one early edition on Saturday. Instead of cutting out one coupon at a time, I stack the four inserts together and cut out all four coupons at the same time. Make sense?? Some people staple them together before doing this - I throw caution to the wind. Who has time to staple? While cutting, I sort the coupons into two piles - Food and Non-Food. This makes it a lot easier when I file the coupons.

My binder is divided into the same two sections. I have alphabetical dividers for both sections, so A-Z for all my food items and A-Z for all my non-food items. In between each divider are baseball card inserts.


I then file my coupons by manufacturer name (i.e. Nestle, Pillsbury, Campbell's etc.). I originally was going to file by category (breads, dairy, etc.) but found that my brain couldn't handle it. There were just too many products that I felt could go in multiple sections and I didn't want to take time guessing which section I thought I filed the coupon under. By filing by manufacturer's name, I know right away every time where the coupon is.

Each individual letter is not alphabetized. For example, if you look under "P," the coupons in that section are not in order. Why? It would drive me insane and take up too much time to move around each week. At the grocery store I can quickly scan my "P" section to see what I have and don't have.


This next part is critical: I then file only one type of coupon per slot. So say I cut out a coupon that reads "Pillsbury Crescent Rolls Buy One Get One Free." All 4 of those coupons would go in one slot. Even if I already have the exact same coupon from last month. I don't put them in the same slot because they have different expiration dates. I need to be able to quickly glance and see what I have without digging through coupons. If the coupons don't fit in the slot, I fold them. I try to keep it so the expiration date is visible on the front. At the beginning of each month I go through and pull out expired coupons.


In the back of my binder I try to keep a calculator, writing utensils, and a price pad to jot down the prices of different things at different stores (I'm not so good at this yet). The calculator is missing in this pic due to a curious 4 year old.


Breakdown of Time:

I cut and file coupons every Sunday night while watching TV. This takes anywhere between a half hour and 1-1/2 hours depending on what show is on :)

I print my list from the Grocery Game and try to shop every Tuesday morning. Shopping for the week usually only takes me 30 minutes.

Having a system for coupons is what is working for me this week. For more fun tips head to Shannon's blog where she hosts Works for me Wednesday every week.

My previous WFMW posts:

Sweet Spinach Bread
Library Bags
Letterboxing
Curling Ribbon
Safe Plastics
5 Ingredients or Less
Laundry Tip
DIY Lip Gloss
Tips for Clothes Shopping with girls
How to teach a child to swallow pills
Removing old stickers, adhesive, etc.
Easy Hair Bow InstructionsManaging school papers
Fall Traditions

Tuesday, July 8, 2008

WFMW - Laundry Tip


I love this product. So far I haven't found a stain that it hasn't removed. Ella's clothes are ALWAYS covered in marker, food, dirt, etc., so I usually have to carefully pretreat everything. Not anymore. I hardly pretreat any of her clothes, I just let All Small and Mighty do its magic. We have used it now for about 2 weeks and I can't say enough good things about it. Never thought I'd be raving about detergent.

We usually use All Free and Clear because of my kids eczema. I think we have finally outgrown that stage - they haven't reacted to the change in detergent. But if you have kids with sensitive skin, there is an All Small and Mighty Free and Clear. Wow - that's a mouthful.

(Quick disclaimer: I just realized this sounds like an advertisement. I'm in no way involved with All or have any family members on their payroll - just super excited about something that has been cutting laundry time in half :))

Fantastic new laundry detergent is what is working for me this week, for more wonderful ideas visit Works for me Wednesday hosted by Shannon at Rocks in my Dryer.

My previous WFMW posts:

Sweet Spinach Bread
Library Bags
Letterboxing
Curling Ribbon
Safe Plastics
5 Ingredients or Less


Tuesday, June 24, 2008

WFMW - Safe Plastics


(Jump down past this paragraph to go straight to the plastics tip)

Tonight has been crazy! We had a ward activity at the church assembling the food part of our 72 hour kits (more about that later) and during that I had to duck out and jump over to a Wallet Watchers meeting where I was asked to be a guest speaker and present The Grocery Game. So I was going to be good and go to bed and not post my tip until tomorrow but then Ella woke up and started vomiting. My Ella is the only child I know who immediately after vomiting tries to help clean up the mess. It was the saddest sight over here, her huge crocodile tears, flushed cheeks from her 103+ temp, and my sweet little girl trying to help out. She is now laying beside me asleep and I'm trying desperately to stay awake until her fever goes down. Enough with that and onto my tip:

SAFE PLASTICS

I have avoided learning too much about safe/unsafe plastics over the past couple of years. I learned the basics and knew to avoid #3, #6, and #7 but have to admit that I didn't always check the numbers. I knew if I researched it I would go full throttle into removing plastics from my house/life/kids life and it just seemed that I already had too much on my plate.

Last week, after talking to a friend, I finally felt ready. She pointed me in the direction of two articles that are easy to read, short, and to the point. The first article explains the dangers of the different types of plastics, tells which plastics to look for, and gives easy steps "for safer, more sustainable food use of plastics." The second link is a guide showing common household plastic products and their numbers. I had no idea Reynolds Wrap was a #3. Yikes!

Here's the links:
1. Smart Plastics Guide
2. Quick Start Chart

Maybe now that I have blogged about it I'll actually do it!

Easy info on safe plastics is what works for me this week, for more wonderful ideas visit Works for me Wednesday hosted by Shannon at Rocks in my Dryer.

My previous WFMW posts:

Sweet Spinach Bread
Library Bags
Letterboxing
Curling Ribbon

Tuesday, June 10, 2008

WFMW - Curling Ribbon


See this cute gift with the matching ribbon . . . I have a secret . . . it's not ribbon - it's the wrapping paper. My mom completely surprised me when she wrapped a gift like this last week. I had to quickly take pictures before she left with it. Maybe ya'll are light years ahead of me but I never thought of curling the actual paper. I don't think outside the box that way.

This is so incredibly easy. You do it the same way you curl ribbon, just go a little slower and more cautiously since paper breaks so much easier.

Saving money on gift wrap is what works for me this week, for more wonderful ideas visit Works for me Wednesday hosted by Shannon at Rocks in my Dryer.

My previous WFMW posts:

Sweet Spinach Bread
Library Bags
Letterboxing

Tuesday, June 3, 2008

WFMW - Letterboxing


"Mom, I'm Bored" Summer Edition - SO EXCITED FOR THIS!!

One of the things I have on my calendar for summer this year is weekly letterboxing excursions. If you haven't heard of letterboxing before, hold on to your hats - this is way cool.

Letterboxing is like going on a real live treasure hunt. There are letter boxes hidden all over the country (and all over the world). I just looked up my area and we have 266 boxes to try and find (obviously not all in one summer). This site explains letterboxing well and is the place you go to get clues, find boxes, etc. Here are some very basic directions on how to join in the fun:

How to go on a letterbox excursion:

1. Print up the clues and head to the basic location.
2. Based on clues try and find the hidden box.
3. Once you locate the box, very carefully pick up the box so that non-letterboxers don't know what you are doing (kids love the secretive aspect to this).
4. Take the stamp in the box and stamp your logbook.
5. Take your stamp and stamp the logbook in the box to prove you were there.
6. Rehide the box.

Materials needed:

1. Family stamp that you can make yourself or buy from a craft store. Any stamp that you think represents your family.
2. Ink pad.
3. Logbook (any notebook will work well for this).

Why I LOVE letterboxing:

1. IT'S FREE!! (Besides the minimal cost of a logbook and stamp).
2. It is a fun adventure where the kids get to use their brains outdoors.
3. You go to so many different places you might normally not go (different parks, hiking trails, city monuments, etc.).
4. Did I mention it's free!

In a moment of sheer panic a couple months ago when I realized summer was looming over us, I came up with a whole calendar of activities to fill our days. I will be posting some more free (or really cheap) ideas to help keep summer fun over the next few weeks, so check back for some more soon!

For some more tips to beat the summer blues, check out Works for Me Wednesday hosted by Shannon at Rocks in my Dryer.

Tuesday, May 27, 2008

WFMW - Library Bags

We are a family of readers. One of our favorite activities is to visit the library. Between the four of us, we usually have 35-40 books checked out at a time. We are really good at getting the books, not so good at returning them on time (even though we literally live a couple of steps from the library). I realized that half the battle was rounding up the library books to return. About a year ago, I took a large canvas bag and put it in our living room next to one of our bookshelves. ALL library books are kept there. As soon as we finish a book, it goes back in the bag. This has made it much more easier to find books when we need to return them. We are hardly ever late now. This week though, I took it a step further. I noticed that most of our fines (when we get them) were on the kids books. So I bought two reusable bags from Trader Joe's and put a bag in each of their rooms for library books. It is much easier for them when they finish reading, to put the book back in the bag in their room than to bring it all the way downstairs. Such a simple easy idea, I wish I would have done it years ago.

For more tips from some amazing women, visit Works for me Wednesday hosted by Shannon at Rocks in my Dryer

Wednesday, May 21, 2008

WFMW - Spinach Sweet Bread


For those of you who don't know yet, Works For Me Wednesday is a blog carnival that Shannon started over at Rocks In My Dryer. I have been getting so many amazing tips from there, I had to join in the fun!

Last week while picking up some flowers at our local nursery, they were giving out samples of food made using their herbs and vegetables from the garden. This spinach sweet bread was to die for - I had to get the recipe. I made it this week with fresh spinach from our farmer's market and herbs from my garden - it made me feel oh so Martha Stewartishy (is that a word???). My family devoured it. Hiding vegetables in yummy cake is what works for me this week. For more tips from some amazing moms visit Rocks in my dryer - WFMW

Spinach Sweet Bread
(Recipe from Heather Hill Gardens)

1 cup sugar
1-1/2 cups all-purpose flour
2 teaspoons baking powder
1 teaspoon baking soda
1 teaspoon salt
2 teaspoons finely crumbled mixed dried herbs (such as parsley, thyme, rosemary, mint, lemon verbena)
1/2 cup sliced almonds
1/2 cup vegetable oil
2 large eggs
2 cups chopped fresh spinach (if frozen, drain well)
Butter for greasing pans

Preheat oven to 400 degrees F. Using a wooden spoon or hand-held mixer, mix all dry ingredients, then add oil, eggs, and spinach. Beat until well blended. Lightly grease one loaf pan or two half-size loaf pans with butter and pour in batter. Bake at 400 degrees F. for 30 minutes or until edges are just starting to brown and a cake tester comes out clean. Remove from pan and let cool. Freezes well.